
11 KiB
Link Aggregation (aka Trunking)
The RTL827x allows to combine multiple ports to a single logical link (Link Aggregation / Trunking) according to IEEE 802.3ad. LAGs allow to combine the individual physical links into a single link with the combined throughput and automatic redundancy when one of the link fails. Up to 4 Link Aggregation Groups (LAGs) can be defined on the switch devices.
LAG control
Four registers RTL837X_TRK_MBR_CTRL_BASE(lag) (0x4f38-0x4f44) define the LAG membership
via a port mask of the logical port numbers.
A hash algorithm applied to L2, L3 and L4 properties of a packet are used to decide which of the links (ports) is being used to transfer the packet. The possible properties used in the hash are:
#define LAG_HASH_SOURCE_PORT_NUMBER	0x01
#define LAG_HASH_L2_SMAC		0x02
#define LAG_HASH_L2_DMAC		0x04
#define LAG_HASH_L3_SIP			0x08
#define LAG_HASH_L3_DIP			0x10
#define LAG_HASH_L4_SPORT		0x20
#define LAG_HASH_L4_DPORT		0x40
#define LAG_HASH_DEFAULT (LAG_HASH_L2_SMAC | LAG_HASH_L2_DMAC | LAG_HASH_L3_SIP | LAG_HASH_L3_DIP | LAG_HASH_L4_SPORT | LAG_HASH_L4_DPORT)
The hash algorithm used to select links (exit ports) is defined for each LAG individually in
RTL837X_TRK_HASH_CTRL_BASE (0x4f48-0x4f54).
Trunking API
The code currently provides the following functions:
/*
 * Configure LAGs
 * Sets the members via port bitmask of a given Link Aggregation Group
 * The groups have numbers 0-3
 * The bitmask represents up to 10 ports
 * If currently no LAG has algorithm used, a default is applied
 */
void port_lag_members_set(__xdata uint8_t lag, __xdata uint16_t members) __banked;

/*
 * Configures the hash algorithm used for a LAG
 * lag is the Group to configure and hash is a bitmask
 */
void port_lag_hash_set(__xdata uint8_t lag, __xdata uint8_t hash_bits) __banked;
LAG configuration on the Serial Console
For testing the following commands are provided on the serial console:
> lag <LAG-ID> [p1] [p2]...
  Create or set a LAG. Trunk-ID is 1 or 2. Ports are physical ports
  If only the LAG-ID is given but no members, the LAG is deleted

> laghash 0 [hash1] [hash2]...
  Uses the given packet properties when hashing the packet to select the link
  Names for the hashes are spa, smac, dmac, sip, dip, sport, dport
When a lag is creates, by default the hash is based on smac, dmac, sip, dip, sport, dport. When you use your own hash settings, make sure that the hash always uses both the source and destination property of the packet, as otherwise pakets will not be routed symmetrically.
LAG configuration via the Web Interface
In the web-interface select Link Aggregation in the left navigation panel. The page will look like this:
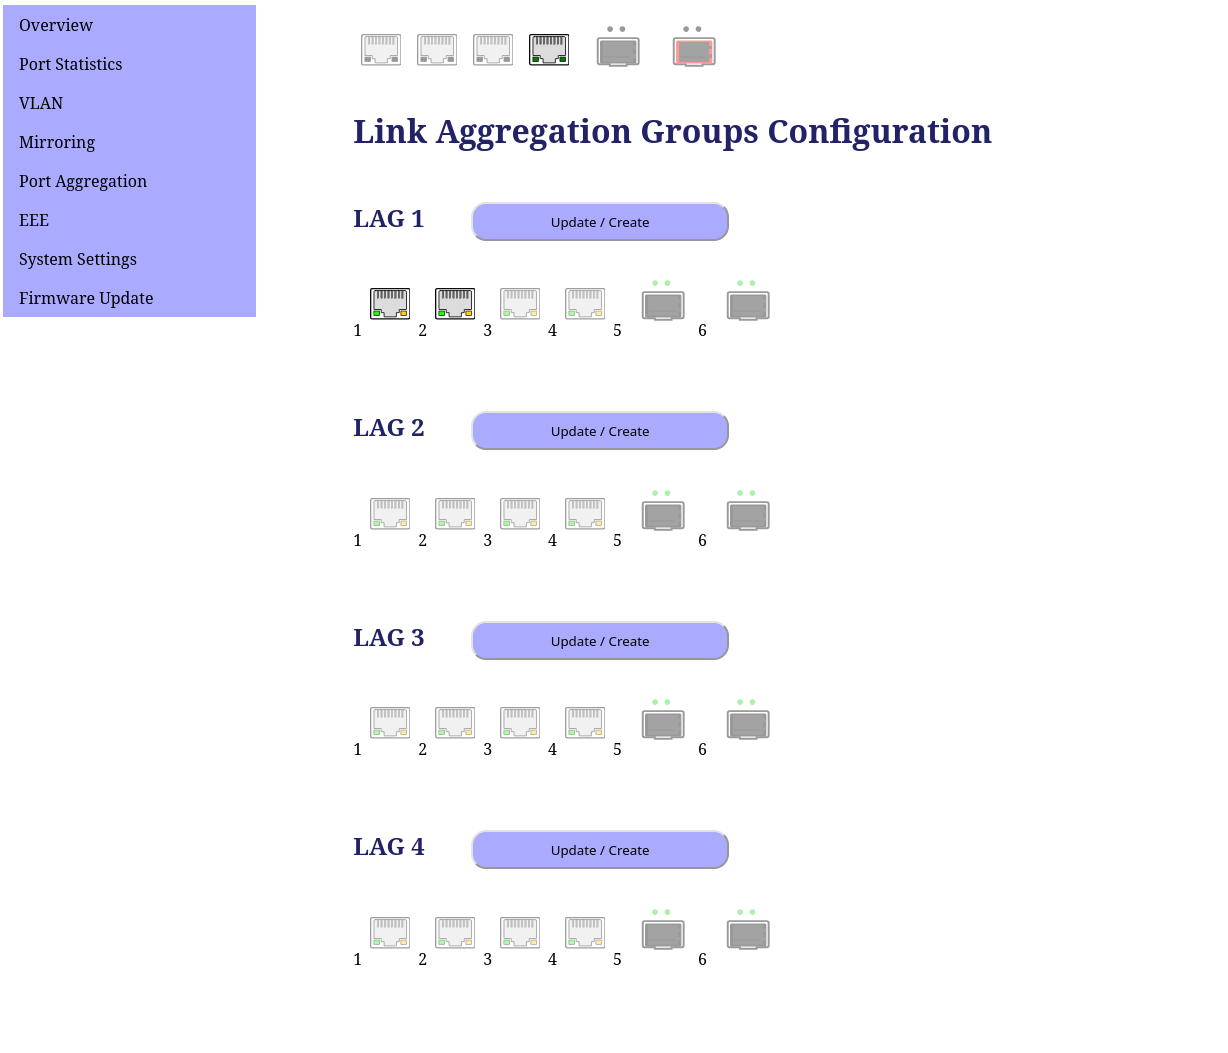 Each of th 4 LAGs is configured separately. After the web-page has loaded, the current configuration
can be edited by clicking on the port-images to include that port or exclude it from a LAG.
When pressing on the Create/Update button, the LAG will be automatically created if not yet done, or
updated. If a lage is updated to not having any members, then it is effectively deleted.
Each of th 4 LAGs is configured separately. After the web-page has loaded, the current configuration
can be edited by clicking on the port-images to include that port or exclude it from a LAG.
When pressing on the Create/Update button, the LAG will be automatically created if not yet done, or
updated. If a lage is updated to not having any members, then it is effectively deleted.
All LAGs are created with the default hash-function (see above). This currently cannot be changed from the Web.
A Test using a single Linux Desktop
The following is a simple test using 2 RTL 2.5 GBit switches with at least 1 SFP+-port each. You will also need 4 10GBit SFP+ modules (DAC or Fiber) and 2 SFP+ ports on your desktop.
The following shows the network configuration
                                -----------------             -----------------
    Linux Comuter               |                | 2.5 GBit   |                |         same Linux Computer
            ----------  10G     |            P1  |------------| P1             |   10G    ----------
192.168.9.1 |  SFP+  |==========| Switch 1       | 2.5 GBit   |    Switch 2    |==========|  SFP+  | 192.168.9.2
 enp1s0f0   ----------          |            P2  |------------| P2             |          ----------  enp1s0f1
                                |                |            |                |
                                ------------------            -----------------
On both switches create a LAG with ports 1 and 2 inside and the default hash algorithm which takes source and destination ports into account, e.g. just use the default:
> lag 0 1 2
The following shows the configuration on the desktop using a dual 10GBit card with 2 SFP+ modules:
[234690.755634] ixgbe: Intel(R) 10 Gigabit PCI Express Network Driver
[234690.755637] ixgbe: Copyright (c) 1999-2016 Intel Corporation.
[234690.921614] ixgbe 0000:01:00.0: Multiqueue Enabled: Rx Queue count = 12, Tx Queue count = 12 XDP Queue count = 0
[234690.921914] ixgbe 0000:01:00.0: 32.000 Gb/s available PCIe bandwidth (5.0 GT/s PCIe x8 link)
[234690.921999] ixgbe 0000:01:00.0: MAC: 2, PHY: 19, SFP+: 5, PBA No: FFFFFF-0FF
[234690.922002] ixgbe 0000:01:00.0: 28:41:c6:xx:xx:aa
[234690.924946] ixgbe 0000:01:00.0: Intel(R) 10 Gigabit Network Connection
[234690.990024] ixgbe 0000:01:00.0 enp1s0f0: renamed from eth0
[234691.056447] ixgbe 0000:01:00.0: registered PHC device on enp1s0f0
[234691.089417] ixgbe 0000:01:00.1: Multiqueue Enabled: Rx Queue count = 12, Tx Queue count = 12 XDP Queue count = 0
[234691.089706] ixgbe 0000:01:00.1: 32.000 Gb/s available PCIe bandwidth (5.0 GT/s PCIe x8 link)
[234691.089788] ixgbe 0000:01:00.1: MAC: 2, PHY: 19, SFP+: 18, PBA No: FFFFFF-0FF
[234691.089790] ixgbe 0000:01:00.1: 28:41:c6:xx:xx:ab
[234691.160997] ixgbe 0000:01:00.1: Intel(R) 10 Gigabit Network Connection
[234691.166102] ixgbe 0000:01:00.1 enp1s0f1: renamed from eth0
[234691.231579] ixgbe 0000:01:00.1: registered PHC device on enp1s0f1
[234691.236965] ixgbe 0000:01:00.0 enp1s0f0: detected SFP+: 5
[234691.485031] ixgbe 0000:01:00.0 enp1s0f0: NIC Link is Up 10 Gbps, Flow Control: RX/TX
[234691.557003] ixgbe 0000:01:00.1 enp1s0f1: detected SFP+: 18
[234691.753061] ixgbe 0000:01:00.1 enp1s0f1: NIC Link is Up 10 Gbps, Flow Control: RX/TX
Now set up 2 network namespaces and put each interface inside one:
sudo ip netns add netns_eth0
sudo ip netns add netns_eth1
sudo ip link set enp1s0f0 netns netns_eth0
sudo ip link set enp1s0f1 netns netns_eth1
Configure network interface addresses 192.168.9.2 and 192.168.9.1 in each namespace:
sudo ip netns exec netns_eth0 ifconfig enp1s0f0 192.168.9.1 netmask 255.255.255.0

sudo ip netns exec netns_eth0 ip a
1: lo: <LOOPBACK> mtu 65536 qdisc noop state DOWN group default qlen 1000
    link/loopback 00:00:00:00:00:00 brd 00:00:00:00:00:00
24: enp1s0f0: <BROADCAST,MULTICAST,UP,LOWER_UP> mtu 1500 qdisc mq state UP group default qlen 1000
    link/ether 28:41:c6:xx:xx:aa brd ff:ff:ff:ff:ff:ff
    altname enx2841c6xxxxaa
    inet 192.168.9.1/24 scope global enp1s0f0
       valid_lft forever preferred_lft forever
    inet6 fe80::2a41:c6ff:fexx:xxaa/64 scope link proto kernel_ll
       valid_lft forever preferred_lft forever

sudo ip netns exec netns_eth1 ifconfig enp1s0f1 192.168.9.2 netmask 255.255.255.0

sudo ip netns exec netns_eth1 ip a
1: lo: <LOOPBACK> mtu 65536 qdisc noop state DOWN group default qlen 1000
    link/loopback 00:00:00:00:00:00 brd 00:00:00:00:00:00
25: enp1s0f1: <BROADCAST,MULTICAST,UP,LOWER_UP> mtu 1500 qdisc mq state UP group default qlen 1000
    link/ether 28:41:c6:xx:xx:ab brd ff:ff:ff:ff:ff:ff
    altname enx2841c6xxxxab
    inet 192.168.9.2/24 scope global enp1s0f1
       valid_lft forever preferred_lft forever
    inet6 fe80::2a41:c6ff:fexx:xxab/64 scope link proto kernel_ll
       valid_lft forever preferred_lft forever
Test is using ping. On both switches one of the 2.5Gbit links and all 10GBit links should show activity:
$ sudo ip netns exec netns_eth1 ping 192.168.9.1
PING 192.168.9.1 (192.168.9.1) 56(84) bytes of data.
64 bytes from 192.168.9.1: icmp_seq=1 ttl=64 time=0.082 ms
64 bytes from 192.168.9.1: icmp_seq=2 ttl=64 time=0.130 ms
^C
--- 192.168.9.1 ping statistics ---
2 packets transmitted, 2 received, 0% packet loss, time 1030ms
rtt min/avg/max/mdev = 0.082/0.106/0.130/0.024 ms
You can also verify that the redundancy works by unplugging the active link, the ping should continue undisturbed with the other link now tranporting the pakets.
In 2 shells, start 2 instances of iperf, listening on 2 different ports. You will need to make sure that the hash algorithm assigns different switch ports for the different port numbers. You can check this by running the iperf3 client against each server instance and verify that different links show activity:
sudo ip netns exec netns_eth0 iperf3 -s

sudo ip netns exec netns_eth0 iperf3 -s -p 5333
Now you can run the clients in parallel:
$ sudo ip netns exec netns_eth1 iperf3 -c 192.168.9.1 & sudo ip netns exec netns_eth1 iperf3 -p 5333 -c 192.168.9.1
[1] 295484
Connecting to host 192.168.9.1, port 5201
[  5] local 192.168.9.2 port 60996 connected to 192.168.9.1 port 5201
Connecting to host 192.168.9.1, port 5333
[  5] local 192.168.9.2 port 39660 connected to 192.168.9.1 port 5333
[ ID] Interval           Transfer     Bitrate         Retr  Cwnd
[  5]   0.00-1.00   sec   283 MBytes  2.37 Gbits/sec  485    272 KBytes
[ ID] Interval           Transfer     Bitrate         Retr  Cwnd
[  5]   0.00-1.00   sec   283 MBytes  2.37 Gbits/sec  479    379 KBytes
[  5]   1.00-2.00   sec   280 MBytes  2.35 Gbits/sec  444    260 KBytes
[  5]   1.00-2.00   sec   280 MBytes  2.35 Gbits/sec  578    267 KBytes
[  5]   2.00-3.00   sec   281 MBytes  2.36 Gbits/sec  385    263 KBytes
[  5]   2.00-3.00   sec   280 MBytes  2.35 Gbits/sec  373    375 KBytes
[  5]   3.00-4.00   sec   280 MBytes  2.35 Gbits/sec  430    385 KBytes
[  5]   3.00-4.00   sec   280 MBytes  2.35 Gbits/sec  452    273 KBytes
[  5]   4.00-5.00   sec   281 MBytes  2.36 Gbits/sec  319    256 KBytes
[  5]   4.00-5.00   sec   281 MBytes  2.36 Gbits/sec  425    269 KBytes
[  5]   5.00-6.00   sec   280 MBytes  2.35 Gbits/sec  364    264 KBytes
[  5]   5.00-6.00   sec   281 MBytes  2.36 Gbits/sec  561    264 KBytes
[  5]   6.00-7.00   sec   281 MBytes  2.35 Gbits/sec  446    255 KBytes
[  5]   6.00-7.00   sec   280 MBytes  2.35 Gbits/sec  582    263 KBytes
[  5]   7.00-8.00   sec   281 MBytes  2.35 Gbits/sec  494    263 KBytes
[  5]   7.00-8.00   sec   280 MBytes  2.35 Gbits/sec  539    181 KBytes
[  5]   8.00-9.00   sec   281 MBytes  2.36 Gbits/sec  617    389 KBytes
[  5]   8.00-9.00   sec   280 MBytes  2.35 Gbits/sec  490    232 KBytes
[  5]   9.00-10.00  sec   281 MBytes  2.35 Gbits/sec  363    215 KBytes
- - - - - - - - - - - - - - - - - - - - - - - - -
[ ID] Interval           Transfer     Bitrate         Retr
[  5]   0.00-10.00  sec  2.74 GBytes  2.36 Gbits/sec  4347            sender
[  5]   0.00-10.00  sec  2.74 GBytes  2.35 Gbits/sec                  receiver

iperf Done.
[  5]   9.00-10.00  sec   282 MBytes  2.36 Gbits/sec  536    380 KBytes
- - - - - - - - - - - - - - - - - - - - - - - - -
[ ID] Interval           Transfer     Bitrate         Retr
[  5]   0.00-10.00  sec  2.74 GBytes  2.36 Gbits/sec  5015            sender
[  5]   0.00-10.00  sec  2.74 GBytes  2.35 Gbits/sec                  receiver

iperf Done.
[1]+  Done                    sudo ip netns exec netns_eth1 iperf3 -c 192.168.9.1
As you can see, the total throughput was 4.71 GBit/sec which is close to the maximum possible with a single 5GBit link.