# RTLPlayground
A Playground for Firmware development for advanced user of RTL8372/RTL8373 based 2.5GBit Switches.
For each hardware configuration of these devices, there is usually a managed and an
umanaged version sold, with mostly identical hardware. The aim is to provide management
features also for unmanaged devices with additional features such as Management VLAN,
dhcp servers, multi-language support, IPv6 and TLS-encrypted web-pages. At present, however
only the following features are provided:
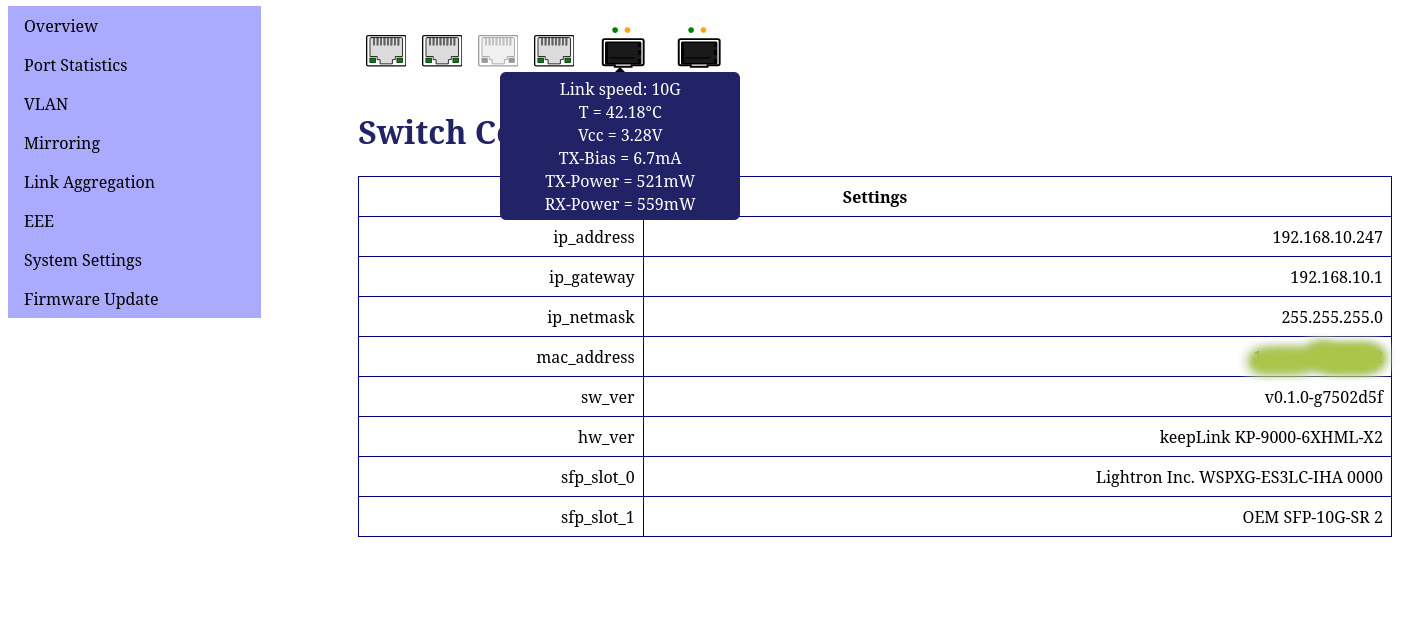
- A modern web-interface with mouse-over to display further information
- A serial console interface to configure all features
- IGMP to configure Multicast streaming
- Port configuration showing detailed informtion about own and Link-partner advertised
Speed settins and configuration of these settings on the local side
- Per-port configuration of frame sizes (MTUs) for Jumbo-Frame support or limiting MTUs
for particular devices
- EEE (Energy Efficient Ethernet) can be configured per-port. Detailed information is
provided for support offered by the link partner and the EEE status of a port.
- VLAN configuration
- SFP information is displayed on the inserted modules, the current sensor values such as
temperatures, RX and TX power are displayed in the CLI and as mouse-over on the web
- Mirror configuration
- Link Aggregation Groups can be set up
- Detailed information on port packet statistics
- Configuration saved to flash via the web-interface
- Firmware updates via the web
- Installation as a firmware upgrade from the original web-interface
 While the firmware provides already considerable improvements over the original managed firmware,
the firmware still lacks support for STP and the proprietary loop prevention
protocols as well as DHCP. If you need these features, do not install the playground on your managed
devices. In any case, installation is strongly discouraged unless you can at least make
a backup of the original flash content via a SOIC clamp such as also used for BIOS
backups and can re-install that firmware in case something is wrong. For this no soldering
skills are necessary.
The firmware supports all hardware featues of devices with
- 4 2.5GBit ports + 2 SFP+ ports
- 5 2.5GBIT + 1 SFP+ port
- 8 2.5GBit + 1 SFP+ port
Devices sold usually have a fairly common design, however there may be differences in the LED
configuration (switches have LEDs with different colours and use types of LEDs). The list
of tested devices can be found in [Supported devices](doc/supported_devices.md).
To do meaningful development you will need to use a serial console, so soldering skills
are required. Flashing must be done via a SOIC-8 PatchClamp or by soldering a socket
for the flash chip.
If you don't want to open your device, you can use the project's code to learn about the
devices by looking at the image using e.g. Ghidra. If you want to contribute to the
design of the web-interface or get a feeling for the interface first, a standalone
device simulator is provided, which runs entirely under Linux as a local webserver.
## (0) Compiling Requirements
Install the following particular build requisites (Debian 12/13), note that Ubuntu 24.04
still has an older version of sdcc, but you will need sdcc version 4.5 for the code to compile:
```
sudo apt install make gcc sdcc xxd python-is-python3 libjson-c-dev
```
While the firmware provides already considerable improvements over the original managed firmware,
the firmware still lacks support for STP and the proprietary loop prevention
protocols as well as DHCP. If you need these features, do not install the playground on your managed
devices. In any case, installation is strongly discouraged unless you can at least make
a backup of the original flash content via a SOIC clamp such as also used for BIOS
backups and can re-install that firmware in case something is wrong. For this no soldering
skills are necessary.
The firmware supports all hardware featues of devices with
- 4 2.5GBit ports + 2 SFP+ ports
- 5 2.5GBIT + 1 SFP+ port
- 8 2.5GBit + 1 SFP+ port
Devices sold usually have a fairly common design, however there may be differences in the LED
configuration (switches have LEDs with different colours and use types of LEDs). The list
of tested devices can be found in [Supported devices](doc/supported_devices.md).
To do meaningful development you will need to use a serial console, so soldering skills
are required. Flashing must be done via a SOIC-8 PatchClamp or by soldering a socket
for the flash chip.
If you don't want to open your device, you can use the project's code to learn about the
devices by looking at the image using e.g. Ghidra. If you want to contribute to the
design of the web-interface or get a feeling for the interface first, a standalone
device simulator is provided, which runs entirely under Linux as a local webserver.
## (0) Compiling Requirements
Install the following particular build requisites (Debian 12/13), note that Ubuntu 24.04
still has an older version of sdcc, but you will need sdcc version 4.5 for the code to compile:
```
sudo apt install make gcc sdcc xxd python-is-python3 libjson-c-dev
```
If using Docker (click to expand)
A Dockerfile is provided for a reproducible build environment:
```
docker build -t rtlplayground-dev .
```
Build the firmware (replace MACHINE with your target, e.g. `DEFAULT_8C_1SFP`):
```
docker run --rm -v $(pwd):/workspace rtlplayground-dev make MACHINE=DEFAULT_8C_1SFP
```
The resulting `.bin` file appears in `output/` on your host.
Build host tools only:
```
docker run --rm -v $(pwd):/workspace rtlplayground-dev make -C tools
```
Run the web-interface simulator locally:
```
docker run --rm -p 8080:8080 -v $(pwd):/workspace rtlplayground-dev \
tools/output/httpd_sim /workspace/html
```
Edit `machine.h` or `config.txt` on your host, then re-run `make` — the
source directory is mounted into the container, so changes take effect
immediately. To build for a different machine, pass `MACHINE=...`.
## (1) Compiling for direct chip flashing AND upgrading an existing RTLPlayground running device
Edit machine.h with an editor like vi or nano. Select the correct machine the firmware should build for.
> [!TIP]
> You can write configuration parameters in config.txt (see below) in order your switch to get
> straight at the first boot, a correct IP configuration.
Now, building the firmware image should work:
```
make
```
Note, that the image generated ends in .bin, not .img, in order to make IMSProg happy.
image location is stored in `RTLPlayground/output/rtlplayground_version_machine.bin`
for example
```
rtlplayground-v0.1.0-12c98ba-dirty-LIANGUO_ZX_SWTGW215AS.bin
```
> [!CAUTION]
> This image can be flashed directly to the chip OR through the firmware update/upgrade
> interface of RTLPlaygound interface
## (2) Compiling for OEM running device with management options (web upgrade)
Managed switches can be updated from the existing original firmware using a SPECIFIC upgrade image.
You first need to build the firmware for direct chip flashing : See below (1)
Then
```
cd installer
make
```
image location is stored in `RTLPlayground/installer/output/rtlplayground_oem_upgrade.bin`
> [!CAUTION]
> This image must ONLY be used for original OEM firmware web interface firmware upgrade.
> You do not need this image if you are already on RTLplayground firmware.
> Unless you go back to the original OEM firmware, you would only flash this specific firmware
> only once. Future upgrades of RTLPlayground will only need to follow (1)
example of compilation console output
```
RTLPlayground/installer$ make
mkdir -p output
gcc updatebuilder.c -o output/updatebuilder
sdas8051 -plosgff -o output/crtstart.rel crtstart.asm
sdcc -mmcs51 --code-loc 0x1000 -o output/installer.rel -c installer.c
sdcc -mmcs51 -Wl-bHOME=0x1100 -Wl-r -o output/rtlinstaller.ihx output/crtstart.rel output/installer.rel
./output/updatebuilder -i output/rtlinstaller.ihx -o output/rtlplayground_oem_upgrade.bin ../output/rtlplayground.bin
Input file size: 524288
Bytes read: 524288
EOF
Payload sum 1 is: 0x25100
Payload sum 2 is: 0x25100
Payload sum with header is: 0x264ec
Payload sum is: 0xf8fe94
Header checksum is: 0x5a1
```
## (3) Sandbox Usage with Ghidra (optional)
You can play with the image using ghidra or flash real Switch Hardware. For
ghidra see this information about [Ghidra images](ghidra.md).
## (4) Installation through the Web interface (software way)
Managed switches (OEM firmware of RTLplaygroud firmware) can be upgraded via the web interface.
Unmanaged switch cannot be flashed this way (see 5).
Go to "Firmware update" tab, select the correct file.
> [!IMPORTANT]
> If your device already runs RTLPlayground, you must upload the binary file /RTLPlayground/output/rtlplayground_Version_Machine.bin
> If your device is OEM, you must upload the binary file /RTLPlayground/installer/outputrtlplayground_oem_upgrade.bin
> [!CAUTION]
> Check one more time that your device matches the machine type before flashing.
> Be shure you have a backup of the original firmware before diving in RTLPlaygroung.
Finally, push the Upload File Button and you're done !
## (5) Flashing the ROM directly (hardware way, but also only way to rescue)
This procedure is the only way to flash unmanaged switches, if the ROM chip is large enough.
This is also the only way to unbrick your device if something went wroong.
> [!IMPORTANT]
> You need a SOIC-8 clip to flash the ROM chip directly onboard.
> Alternatively you can de-solder the flash chip and install a SOIC adapter).
> For flashing the chip directly, you must use the binary file /RTLPlayground/output/rtlplayground_Version_Machine.bin
> [!CAUTION]
> As you need to open your switch case, consider that the warranty is gone.
- Disconnect power from switch.
- Open the switch.
- Attach the clip onto the flash chip (Red line on Pin 1, Pin 1 has a point marker).
- Connect USB of flash programmer, the power LED on the switch will light up, check cabling if not.
- Don't panic, mixing up GND and 3.3V usually does not destroy the switch.
- Use IMSProg, Flashrom, or whatever Programmer to detect the chip.
- MAKE A BACKUP (DUMP) OF THE EXISTING FIRMWARE !
- ERASE THE ROM (BLANK) !
- Load the firmware into IMSProg.
- Flash is to the ROM chip.
- Disconect the clip from the ROM chip.
- You're done, ready for the first boot.
## (6) Connecting a serial interface (optional)
You can connect a serial cable to the UART port found on all the devices, set 8N1 @ 115200 baud.
## (7) Power Up
When you power up the switch, the device will perform some examples and provide a minimal console
(if wired to a serial interface), the documentation of which can be found in the source code rtlplayground.c`.
## (8) The web-interface
The web-interface can be reached under the [default 192.168.10.247](http://192.168.10.247) unless you
specified an IP adress in the config.txt before compilation.
> [!TIP]
> The default password is `1234`.
## (9) The command line
The command line is very rudimentary and mostly for testing purposes.
The following is a boot-log with some examples:
```
Detecting CPU
RTL8373 detected
Starting up...
Flash controller
NIC reset
rtl8372_init called
RTL837X_REG_SDS_MODES: 0x00000bed
phy_config_8224 called
phy_config_8224 done
rtl8224_phy_enable called
rtl8224_phy_enable done
rtl8372_init done
A minimal prompt to explore the RTL8372:
CPU detected: RTL8373
Clock register: 0x00001101
Register 0x7b20/RTL837X_REG_SDS_MODES: 0x00000bed
Verifying PHY settings:
Port State Link TxGood TxBad RxGood RxBad
1 On Down 0x00000000 0x00000000 0x00000000 0x00000000
2 On Down 0x00000000 0x00000000 0x00000000 0x00000000
3 On Down 0x00000000 0x00000000 0x00000000 0x00000000
4 On Down 0x00000000 0x00000000 0x00000000 0x00000000
5 On 2.5G 0x00000008 0x00000000 0x00000000 0x00000000
6 On Down 0x00000000 0x00000000 0x00000000 0x00000000
7 On Down 0x00000000 0x00000000 0x00000000 0x00000000
8 On Down 0x00000000 0x00000000 0x00000000 0x00000000
9 NO SFP Down 0x00000000 0x00000000 0x00000000 0x00000000
> port 5 1g
CMD: port 5 1g
PORT 04 1G
> stat
CMD: stat
Port State Link TxGood TxBad RxGood RxBad
1 On Down 0x00000000 0x00000000 0x00000000 0x00000000
2 On Down 0x00000000 0x00000000 0x00000000 0x00000000
3 On Down 0x00000000 0x00000000 0x00000000 0x00000000
4 On Down 0x00000000 0x00000000 0x00000000 0x00000000
5 On 1000M 0x00000035 0x00000000 0x00000017 0x00000000
6 On Down 0x00000000 0x00000000 0x00000000 0x00000000
7 On Down 0x00000000 0x00000000 0x00000000 0x00000000
8 On Down 0x00000000 0x00000000 0x00000000 0x00000000
9 NO SFP Down 0x00000000 0x00000000 0x00000000 0x00000000
>
Rate: 67 Encoding: 01
Lightron Inc. WSPXG-ES3LC-IHA 0000
> stat
CMD: stat
Port State Link TxGood TxBad RxGood RxBad
1 On Down 0x00000000 0x00000000 0x00000000 0x00000000
2 On Down 0x00000000 0x00000000 0x00000000 0x00000000
3 On Down 0x00000000 0x00000000 0x00000000 0x00000000
4 On Down 0x00000000 0x00000000 0x00000000 0x00000000
5 On 1000M 0x00000065 0x00000000 0x0000003b 0x00000000
6 On Down 0x00000000 0x00000000 0x00000000 0x00000000
7 On Down 0x00000000 0x00000000 0x00000000 0x00000000
8 On Down 0x00000000 0x00000000 0x00000000 0x00000000
9 SFP OK 10G 0x00000000 0x00000000 0x0000001c 0x00000000
> sfp
CMD: sfp
Rate: 67 Encoding: 01
Lightron Inc. WSPXG-ES3LC-IHA 0000
```
## (10) Advanced configuration
You can configure more deeply the switch without the need of the console mode.
While in compilation part, you might write directly to config.txt file before making the binary firmware
```
nano config.txt
```
If you want to modify settings after the flash is done, go to the Advanced Settings tab in System Settings
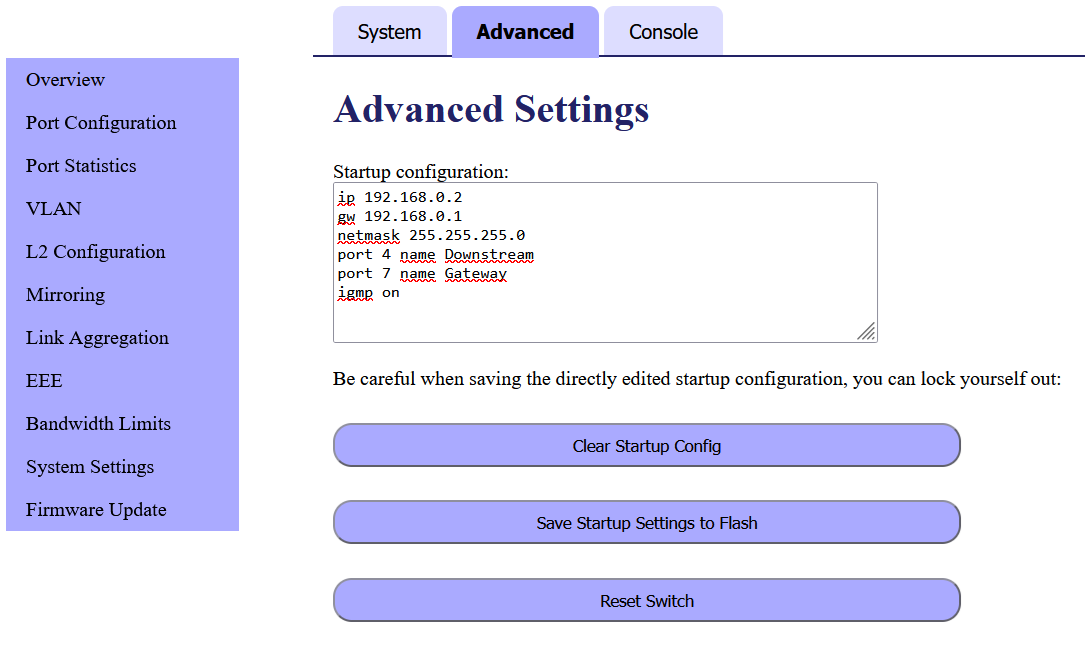 ```
ip xxx.xxx.xxx.xxx = IP adress of the switch
gw yyy.yyy.yyy.yyy = IP adress of the gateway
netmask zzz.zzz.zzz.zzz = Network mask of the switch
port x name xxx = Name xxx the port number x
port z 1g = Set 1g speed for port z
igmp on/off = Turn IGMP on or off
```
[To be continue]
Enjoy playing!
## (11) Other documents
The following documents give further documentation on specific features of the RTL837x SoCs:
- [RTL8372/3 Feature support](doc/hardware.md)
- [CPU Port](doc/CpuPort.md)
- [L2 learning](doc/l2.md)
- [IGMP (IP-MC streaming)](doc/igmp.md)
- [SFP+ ports](doc/sfp.md)
- [Trunking aka. port aggregation](doc/trunking.md)
- [VLAN](doc/vlan.md)
- [Modifications and Flash replacement](doc/mods.md)
```
ip xxx.xxx.xxx.xxx = IP adress of the switch
gw yyy.yyy.yyy.yyy = IP adress of the gateway
netmask zzz.zzz.zzz.zzz = Network mask of the switch
port x name xxx = Name xxx the port number x
port z 1g = Set 1g speed for port z
igmp on/off = Turn IGMP on or off
```
[To be continue]
Enjoy playing!
## (11) Other documents
The following documents give further documentation on specific features of the RTL837x SoCs:
- [RTL8372/3 Feature support](doc/hardware.md)
- [CPU Port](doc/CpuPort.md)
- [L2 learning](doc/l2.md)
- [IGMP (IP-MC streaming)](doc/igmp.md)
- [SFP+ ports](doc/sfp.md)
- [Trunking aka. port aggregation](doc/trunking.md)
- [VLAN](doc/vlan.md)
- [Modifications and Flash replacement](doc/mods.md)